前言
起初写mac工程模板的目的就是为了方便自己在Mac App framework注入的时候懒得每次搭建相应的环境和一系列工具类(主要是自己懒),自己之前做过IOS的文件模板(特别是大工程后期模块化之后特别方便),没接触过工程模板的配置,也借此以文章的形式记录一下流程
创建Mac Framework工程
首先看一下Xcode为我们提供的一些预设的工程模板
全局位置
1
2
3
| /Applications/Xcode.app/Contents/Developer/Platforms/iPhoneOS.platform/Developer/Library/Xcode/Templates/Project Templates/
/Applications/Xcode.app/Contents/Developer/Library/Xcode/Templates/Project Templates
|
用户自定义位置
1
| ~/Library/Developer/Xcode/Templates
|
1、由于目的工程是一个target为动态Framework的工程,所以这边直接在
1
| /Applications/Xcode.app/Contents/Developer/Library/Xcode/Templates/Project Templates/Mac/Framework & Library/Cocoa Framework.xctemplate
|
copy此模板放到用户自定义位置
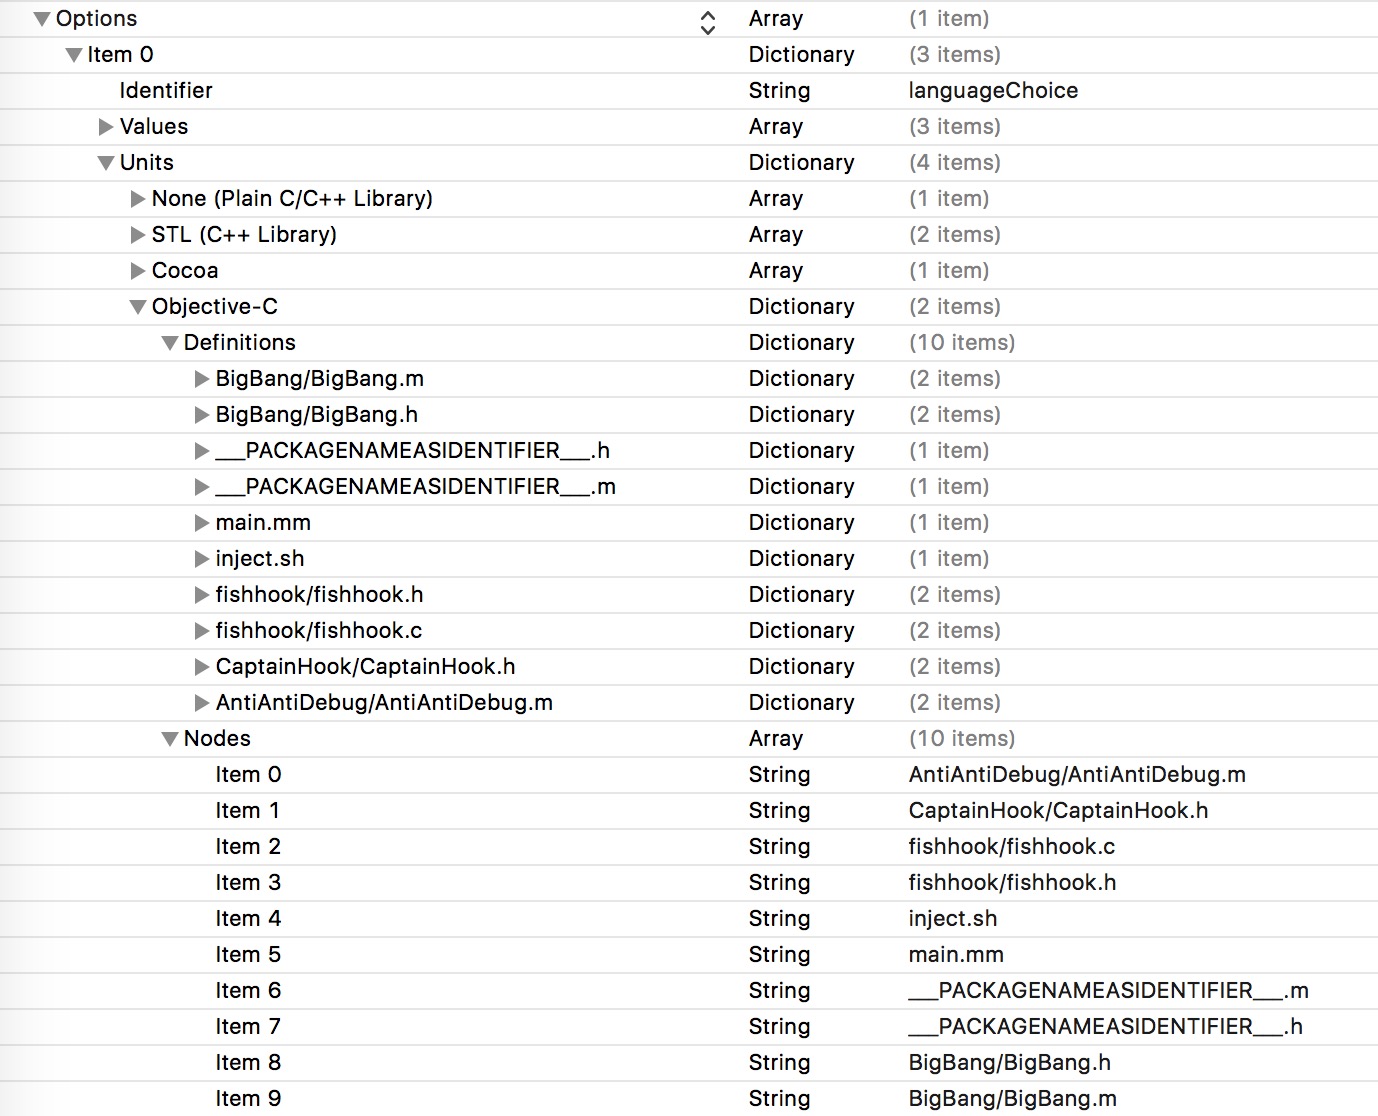
2、模板中除了Xcode需要展示Icon文件就一个plist文件,我们大多数的工作就是把自己要在工程创建初期需要放入的文件全都放入.xctemplate,并让plist知道这些文件存在
3、在plist文件Options中增加Definitions、Nodes这两个属性具体可看下图:
编写注入脚本
本着一劳永逸(懒到没救)的传统,直接在动态Framework生成之后直接注入到指定APP(以下以iMazing为例),脚本不是很复杂
1
2
3
4
5
6
7
8
9
10
11
12
13
14
15
| app_name="iMazing"
framework_name="工程生成framework name"
app_bundle_path="/Applications/${app_name}.app/Contents/MacOS"
app_executable_path="${app_bundle_path}/${app_name}"
app_executable_backup_path="${app_executable_path}_backup"
framework_path="${app_bundle_path}/${framework_name}.framework"
# 备份二进制原始可执行文件
if [ ! -f "$app_executable_backup_path" ]
then
cp "$app_executable_path" "$app_executable_backup_path"
fi
cp -r "${BUILT_PRODUCTS_DIR}/${framework_name}.framework" ${app_bundle_path}
echo ${BUILT_PRODUCTS_DIR}/${framework_name}.framework
echo ${app_bundle_path}
./insert_dylib --all-yes "${framework_path}/${framework_name}" "$app_executable_backup_path" "$app_executable_path"
|
1、首先将上面的sh脚本中的app_name改成目标APP的名字,framework_name改成工程生成的framework name
2、在动态库的target下增加sh运行脚本 $PROJECT_DIR/$PRODUCT_NAME/inject.sh
3、insert_dylib会自动把生成的framework注入到指定的app_executable. insert_dylib我已经放到文章末尾的工程源码里面了
(这边有个小的bug,先不加sh脚本build一下工程,在进行后续操作)
编写注入代码
iMazing的RE过程就不细讲了,有兴趣的可以去iosre 论坛看一下具体细节,我这边直接给出结果
1
2
3
4
5
6
7
8
9
10
11
12
13
14
15
16
17
18
19
20
21
| static void __attribute__((constructor)) initialize(void) {
Class Aclass = objc_getClass("Activation");
SEL selector = NSSelectorFromString(@"checkIfIsActivated");
Method method = class_getInstanceMethod(Aclass, selector);
IMP imp = imp_implementationWithBlock(^(id self) {
return YES;
});
class_replaceMethod(Aclass, selector, imp, method_getTypeEncoding(method));
{
Class Dclass = objc_getClass("DM_SUUpdater");
SEL selector = NSSelectorFromString(@"checkIfConfiguredProperly");
Method method = class_getInstanceMethod(Dclass, selector);
IMP imp = imp_implementationWithBlock(^(id self) {
return;
});
class_replaceMethod(Dclass, selector, imp, method_getTypeEncoding(method));
}
//-[DM_SUUpdater checkIfConfiguredProperly]:
}
|
指定运行APP
其实上面流程运行之后就已经可以达到注入的目的了,其实大部分我们都是需要适时调试的,这里有个技巧
Xcode->Edit Scheme->Run->Executable->iMazing.app
进行相关注入之后,Xcode会帮我们运行起指定的APP,这时就可以在Xcode实时断点跟打印相关信息了
工程源码以及相关链接
源码
相关链接